“I Wonder Where the Boidie Is”
The spring is sprung, the grass is riz.
I wonder where the boidie is.
They say the boidie’s on the wing.
But that’s absoid. The wing is on the bird.
Paper Pieced Bird
If you never bother to read instructions to the end, please make an exception here.
(finished size 7½” x 9″)
Paper piecing is something that quilters either love or hate. It is a technique that offers great precision and makes intricate blocks possible. Here, I want to showcase tricks that help quilters keep the seam ripping and swearing to a minimum and develop a love for paper piecing.
Supplies:
- Paper Piece Boidie Pattern this is a pdf form
- Wing and Feet Pattern for Boidie this is a pdf form
- Pattern above printed on paper or traced on non fusible interfacing
- 2″ x 9½” strip of background fabric (BG)
- ~4″ wide strips of (BG) fabric (30″ long or several pieces that add up to that)
- ~1½”x 2½” – bird beak
- ~2½”x 2½”– tail
- ~5″x 6″ -bird body
- wing pattern, make 2 copies
- button for eye
Instructions:
- Paper piecing can be done on paper or on non-fusible light interfacing. There are advantages to both. These instructions are for paper.
–Interfacing can’t be printed like paper, you trace the design, but you don’t have to tear it out.
-Interfacing is translucent so you see the pattern on both sides.
-You need smaller stitches (1.5mm) with paper so it tears well. - Print the pattern on paper, then reverse the paper on a light surface and trace the lines on the reverse. This is really helpful for beginners.
- Cut the three pattern pieces apart.


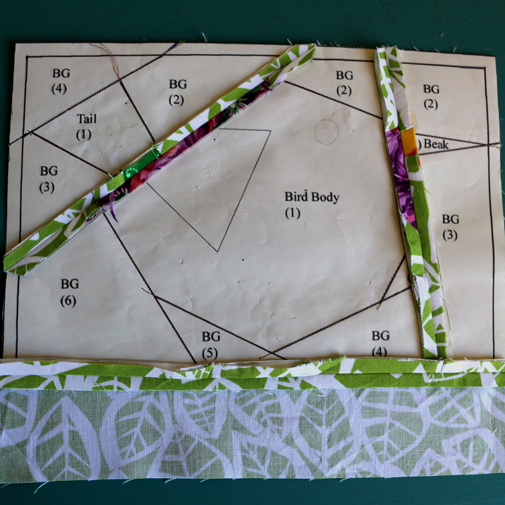
- Refer to the pictures above.
Start with the pattern piece labelled tail and lay it printed side down. Place the tail fabric on the traced tail section, right side up making sure it covers section #1 with at least ¼” overlap on all sides.
Be sure to always lay the fabric on the backside of the pattern and sew on the printed side. Reversing all three pieces gives a mirror image; reversing some pieces causes a mess! - Pin tail fabric to the paper. Fold the tail fabric on each line and trim the fabric so it overlaps the line by about ¼”. Do this by eye, precision is not required.
- Take the BG strip and lay it on top of the tail fabric so it aligns with the seam which overlaps into section #2.
- Hold paper and fabric in one hand and turn the whole piece over so the paper is on top. Pin on the line between section #1-#2 catching both fabrics underneath.
- Turn the unit back around. Fold the BG strip on the pin line and check that it covers section 2 with overlap. If not redo BG strip placement. (Sage advise: Skimping on fabric causes cursing so here just waste fabric!)
- Unfold BG fabric. Turn over just as in step 6 and now move the pin and sew with small (1.5mm or 13) on that pin line (between section #1-#2). These lines always go a few stitches past the intersection or to the end of the seam to prevent raveling.
- Finger press the seam. If you see that you have a gap in your coverage see the fudging trick below.
- Fold the BG fabric on each line of section 2 in the same manner as in step 4.
- Repeat these steps for section #3-#4 of the tail pattern.
- Now trim the tail pattern and fabric to the pattern’s outer line.
- Repeat these steps for the beak and body patterns, starting with 1 and progressing numerically from there. Be careful to put the fabric on the side that is not printed.

- Align the tail section with the body section and sew together on the seam line.
- Align the beak and body section and sew together on the seam line.
- Sew the 2″ strip of BG fabric to the bottom of the bird.
- Remove all the paper from the fabric while trying not to stretch the fabric too much.
- Sew the two wing patterns together right sides together leaving a ~1″ gap. Trim the corners and turn inside out. Whip stitch opening together and using that same thread attach to bird.
- Sew a button for the eye.
- Embroider feet for the bird using a chain stitch.


Fudging Trick
When your fabric doesn’t quite cover the section.


Stretched Boidie
This is a fun way to make a bird. There are no dimensions, you just play and then square up as needed.


Here are some pictures of me making the birds on the right. The one on the left was made by Kathy H.
I cut a rectangle into two triangles for the wings. I covered the 90° corner and another adjacent corner with body fabric and attached a rectangular piece to that side. Now I added background fabric to turn the triangle into a rectangle and squared the edges.
Next I added a beak to a strip of background fabric. positioned it to the body and trimmed extra fabric.
Then I made a strip set with two legs and lots of fabric on both ends which I positioned under the bird, sewed on and then trimmed to square. I added button eyes to finish them off.


Out of the Box –
“I Wonder Where the Boidie Is?”
Make a quiltlet with a Spring or Bird theme.